Saturday, November 14, 2009

New Football Scarf

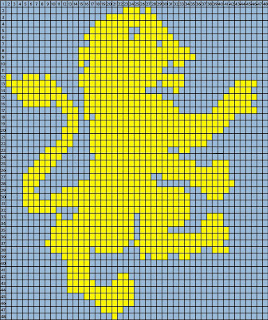
My friend Justin decided he really liked Patrick's Celtic scarf and asked me to make him an Aston Villa Scarf, so I've made charts for it, which are available here on Ravelry.

Here's a little peek for now; I've just started casting on (9 blocks x 48 st per block = 432 sts) so it might take awhile :)

Tuesday, November 10, 2009

New FO's!

I finished Patrick's Celtic Scarf (finally-only took three years!) and I have now perfected the methodology for executing a football scarf - or any color block knitting project, really. I also finished a very basic lace scarf that isn't much to look at but served the dual purpose of letting me play with bamboo yarn and practice lace. I did the lace on a stockinette background so I'll need to block it to make it wearable and I'm pretty lazy when it comes to blocking (I still haven't done Sami's halter).

Anyway, here are the pictures of the Celtic scarf, as well as a link to the charts on Ravelry.

Saturday, October 17, 2009

Update on Patrick's Celtic Scarf


I'm moving along really well on Patrick's Celtic scarf, in fact, I'll probably be done within the week, depending on how much time I devote to it.

Thursday, September 24, 2009

Long Overdue Update

These most adorable cute little monster things were the perfect way for me to use up some of my scrap yarn. Check them out!


The pattern was created by Rebecca Danger who creates some of the most impressive animal toys I've seen on ravelry.

I also finished knitting Sami's halter and all that remains is to block it.

And I made Patrick's sister a birthday/Christmas scarf.You may recognize some of that scrap yarn from the monster chunk project. Zona made this pattern or as she calls it, a recipe.


I also recently started making these gloves without the beads and re-planned Patrick's Celtic scarf to use the woven stitch I used in his sister's scarf. And my roommate Cori asked me to make her a hat with earflaps, tassels and a pom pom. :) I've done a lot since I last wrote!

I'll keep you updated!

Monday, August 17, 2009

Back in the USA

Hello faithful readers! <--That was a joke. I lol'd.

So I'm back in the States now, and I'll start to officially settle down on Wednesday, so expect some more knitting blogs soon!

I'm finishing up Sami's halter top right now, and I'll start making something with my colorful yarn scraps soon.

<3

Tuesday, June 23, 2009

En Afrique!

Greetings from Senegal-
I'm taking a hiatus from the knitting blog while here in Africa, primarily because I didn't bring anything with me and have yet to find anything to buy. I'll be back in August, though, so hold on to your pants!

A bientôt,
Kate

Friday, April 10, 2009

Finished Yoga Mat Bag

I finished my sister's yoga mat bag, complete with om symbol strap. Pictures!

Saturday, April 4, 2009

Another project

After I made that last bag for Alyshia, my sister pretty much fell in love with it. So now I'm making an actual yoga mat bag for her, based on this pattern by Emily Nelson at Joyful Abode. Since my sister (Sarah) liked Alyshia's bag so much, I'm modifying it so it's all mesh-y like the last bag. And I think I'm going to make an Ohm symbol on the handle, but that's the last part. Pictures soon!

Saturday, March 28, 2009

Alyshia May's Birthday Bag

I made a crochet/knit combo bag for my friend's birthday. Pictures! Modeled by my little sister Sarah.

Saturday, March 14, 2009

Cabled Beanie

So I finished the beanie. I learned a few things, such as a stockinette cable on a stockinette background doesn't stand out very well. Also, the top is kind of pointy because I decreased funny, but it's not too bad. Pictures!

Friday, March 13, 2009

New Project

So I was wondering when this whole focus-on-one-project-until-it's-done thing was going to wear off. Consider it worn.

I started a new project that will hopefully go pretty fast. I'm making a 2x2 ribbed beanie, my first ever hat, with some chunky yarn and ginormous needles. Pictures soon.

On a less light note, I found out my uncle died today. That makes three family members in the last two years. I'm still in a bit of shock, although I'm sure it will hit me when I go to the funeral next week. That's how it usually goes for me. He was a pretty amazing guy who enjoyed every day of his life. I'm really lucky to have had him for an uncle.

Monday, March 2, 2009

Ah, we're starting over. It must be Monday

Yes indeed, it is Monday. I started my glove project over again. I decided I don't like the way that first one turned out after all. I learned the trick of putting in a safety thread, though, so I won't have to frog the whole thing and start over. I put one in right before I started increasing for the thumb, so that should save some time should I decide I hate it all again. Which is quite possible.

Thursday, February 26, 2009

One down...

So I finished the first fingerless glove sans flip-mitt today. I started the second one too, but now I have to do homework (always spoiling my fun!) I figure I'll make the two gloves and then do the flip-mitt part last. I like the way it looks though! Not too shabby for my first pair!
and on my hand:
(notice the Picasso in the background? Don Quixote...the irony is astounding)

Monday, February 23, 2009

Fulton Ravelers

So this afternoon/evening, I trekked with Cori to the Fulton Public Library (which is much nicer on the inside than I expected!) and met up with some fellow knitters. It was great fun, although I didn't get much work done on my gloves because I'm at a point where the pattern is baffling me. I'll probably keep going back though! Much fun was had by all!

-Kate

Monday, February 16, 2009

Progress

My flipmits are coming along nicely. I spent the long weekend at my boyfriend's parent's house to celebrate his birthday, and I got quite a bit of work done.
Actually, I got a lot more done than I expected, and I didn't bring anything to hold my thumb-stitches on once I got there. I expect to be done with at least the first one by the end of the week! More updates soon!

Sunday, February 8, 2009

New goodies

Went to JoAnne's today and got new goodies! I'm going to be making my first pair of gloves out of some marvelous gray bamboo yarn. Perhaps some convertible fingerless gloves/mittens (or flipmits as I've heard them called). I like this pattern by Mira Ranki.


*mischievous grin*

Friday, February 6, 2009

Please allow me to state that I am soo very happy to find that there are other French-speaking, craft-making knit-aholics who aren't on the Obama Crazy Train.

Thank you and good night.

Cable-licious ear warmer


I recently joined Ravelry, and in wanting to contribute, I designed this cabled-out ear warmer. Of course, when I started it, the weather was frightful, and by the time I finished it was 50 degrees outside (I swear, it was only a matter of days!) but it should be cooling down again next week and I'll get to wear it. Silly Missouri weather.


::Edit:: Free Pattern now on Ravelry! Go me!

::Edit:: Pattern below in case the downloads don't work:


Cable-licious Ear Warmer 
If you love cables, then you’ll love this ear warmer. I’ll try to make the pattern as specific as possible for beginners, because this is a great way to practice cables in a safe and loving environment. I use a plaited cable for the main, center cable and a two-stitch cable on either side to break up the width of the background.

I don’t hold much stock by gauges and yarn weight; most of my projects are trial and error. However, for your sake, I will give you my yarn and needle size so you can get an approximately similar result.

Yarn: Caron Simply Soft Eco, black
Needles: Size Six

Abbreviations:
k – knit
p – purl
C#B – cable a certain number of stitches to the back. For example, C6B means slip three stitches onto the cable needle and hold it behind your work. Knit three stitches then knit the three stitches on the cable needle.
C#F – cable a certain number of stitches to the front. This is the same principle as above, but instead you will hold the cable needle on the front side of your work.

Cast on 29 stitches.
Row 1:  k29
Row 2:  k4, p2, k4, p9, k4, p2, k4
Row 3:  k4, C2F, k17, C2F, k4
Row 4:  work as Row 2
Row 5:  k4, C2F, k4, C6B, k7, C2F, k4
Row 6:  work as Row 2
Row 7:  work as Row 3
Row 8:  works as Row 2
Row 9:  k4, C2F, k7, C6F, k4, C2F, k4

Repeat rows 2-9 until the rectangle is long enough to circle your head.

Finishing 
I crocheted the ends of my ear warmer together, but sewing will work just as well. When you are finishing, make sure you put right sides together so that your seam doesn’t show on your finished product!